Saturday, January 25, 2014

Burlap Door Hanger Tutorial

Its been a long time since I posted.  I didn't do much crafting in 2013 but I was busy baking up this adorable guy.
This little guy came 20 years after our youngest and we couldn't be more excited.  So between feedings, changing and cuddles I have been crafting again.  Here is my latest obsession, burlap door hangers. 
After looking on pinterest at several tutorials and some trials and errors I came up with my own method of creating these fun door decorations.  First I use my Silhouette Cameo to make a pattern.
Trace pattern onto burlap two times for front and back.
Before cutting out front piece, I like to add any details.
Then I roughly cut around each picture, leaving about an inch of burlap and pin the designs together with a layer of batting between. 
 
 
Time to sew.  I sew about a 1/4 inch from drawn design.  I like to use colored thread so that when I cut it out I don't accidently cut on stitch line.
Leave an opening for stuffing. 
 
Stuff and sew up the rest and then cut around design.
 
After this I water down some Mod Podge and paint it on the front and paint around the edges front and back.  Once this dries it creates a harder surface to paint on and also helps the edges not unravel anymore.
Now it is time to paint and add your hanger.  This one is heading to a sweet family that is having their first baby while going through flight school at Ft. Rucker, Alabama.


Monday, November 12, 2012

A Tool Caddy

I love Pinterest!  Found this awesome tutorial on there last week.  Used up some of my scraps from my Abbey bag project and now I have a matching tool caddy!  It slips over a 5 x 7 acrylic frame that you can get at Dollar Tree or WalMart.  Here is the tutorial, if you would like to make one, too!  The back has another pocket that can hold a small calculator and a sticky pad.

Friday, October 26, 2012

Fall Projects

Here are some Fall projects I have been working on...I started in July.  Above is my simple Thankful banner created with the leftovers from my coffee bean burlap bags (the rest of the burlap is being turned into Christmas stockings).  To make the banner I cut out the triangles and then printed the word out using the font Pharmacy , cut out each letter and traced it onto the burlap with a sharpie.  The final step was to thread them all together with some twine.
The next project was made in July for my mom's 70th birthday.  It is a very simple table topper or for her a lap quilt since she is only 4'11. 
Here is another made for my friend's 60th birthday.  I used thispattern for both of the table toppers.
My mother in law has a very big oval table in her kitchen and so instead of a table topper I created a long runner for her.

And finally a little something for me.  This is hanging on my craft room door.   I used this pattern.

Saturday, September 29, 2012

Double Slice Layer Cake Quilt

This was a fun quilt to do.  Easy = Fun  The size comes out to a 56 x 56.5, a perfect lap size quilt.  The layer cake I used was Boutique Fabric by Chez Moi for Moda.  I wasn't sure of the colors, but once the quilt top was complete I loved it.  Here is the tutorial that inspired my design.  I used 25 layer cakes for the Double Sliced Layer Cake block.  A 2.5 inch border in cream.  A 4.5 inch border with 15 remaining layer cakes (leftovers were pieced into the back).

Sunday, September 23, 2012

Pinterest Inspiration

A piece of foam from the dollar tree, a mirror from hobby lobby, a pack of glue sticks also from hobby lobby, a can of plastic primer, a can of silver paint and 196 spoons and I created this using this tutorial from Linda at craftaholics anonymous.  The next time I make one I will be sure to get all of the glue gun strings off of the spoons.  They really show up after you start putting on the paint.  So a little sanding and more paint later this mirror is now hanging up in the hall bath with a command strip.

Monday, August 13, 2012

Digital Artwork

Here are a few projects I have worked on recently.  The first is a gift for a friend from my sewing group.  They just welcomed their fourth child!
The second project is a 12 x 12 calendar I created for our coffee shop.  By using a dry erase marker on the glass you are able to reuse this calendar over and over again.  The original idea came from this cute blog.

Monday, June 25, 2012

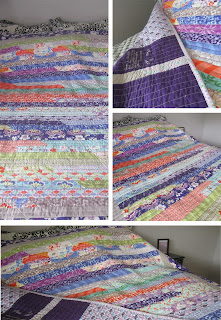
Bekah's 1600 Quilt


Just in time for Rebekah's 19th birthday.  I bought this Moda "Good Fortune" jelly roll in January to make a quilt for Rebekah to take with her to college.  I didn't finish it in time for her move, but I did finish it in time for her birthday.